NOTE: Applies to iOS devices only.
Administrators are able to add Locker Custom Options to their iOS Workflows to automatically add the Device User name to the device Lock Screen.
- Beginning with Mobile Access Management 7.0, this is the preferred method of configuring the device Lock Screen to display the user name, instead of the Set Wallpaper workflow action.
- Applies to the iOS Express Checkout, DEP, and non-DEP workflow models.
Behavior
- At checkout, the user is prompted to allow Live Activities on the device. Live Activities launches Imprivata Locker.
NOTE: If the user taps Don’t allow at the Live Activities prompt, the feature will not work and the user will not be prompted to re-enable or allow. This is a one-time prompt; it will not appear at each checkout. Live Activities can be re-enabled in Settings. - The lock screen of the checked out device will display the Device User.
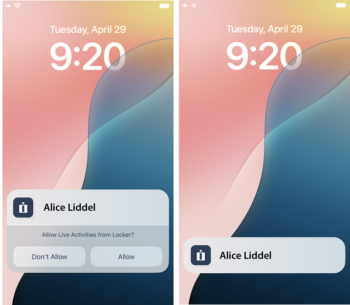
- When the user returns the device, the Check In workflow is run and Live Activities is cleared from the device.
- If the user swipes left on the Live Activity from the lock screen and dismisses the Live Activity, opening Imprivata Locker re-initiates Live Activity the next time the device locks.
- Tapping the Live Activity opens the Imprivata Locker app.
Requirements
Take note of the following prerequisites:
- Requires that your MAM organization be enabled for Check Out.
- Requires iOS devices running iOS 18 and later.
- Requires Imprivata Locker for iOS 4.0 or later.
Configure Locker Custom Options to Enable Live Activities
Use Locker Custom Options to enable Live Activities by one of the following methods:
- At a global level by an Admin > Check Out setting.
- To multiple devices by adding the Locker Custom Options to your Workflow.
- To a single device by its Device Details.
Add Locker Custom Options Globally
- In the MAM admin console, navigate to Admin > Check Out > Locker Custom Options, click Configure.
- In the Locker Custom Options field, enter the key/value pair in JSON format and click Save.
JSON Syntax
 {
    "LiveActivityEnabled": true
}
If you already have Locker Custom Options defined for your devices, you can add this key/value pair to your JSON as another line:
 {
    "DefaultDomain": "mydomain.onmicrosoft.com"
    "LiveActivityEnabled": true
}
Add Locker Custom Options to Multiple Devices
To apply custom options to multiple devices at once, add the Locker Custom Options action to a Workflow.
- In the MAM admin console, navigate to Workflows.
- Create a new Workflow for iOS devices, or edit an existing iOS Workflow.
- Click Add an action > Advanced > Locker Custom Options.
- Enter the key/value pairs in JSON format and click Save.
- Click Save Workflow and deploy to the devices.
Add Locker Custom Options to a Single Device
To apply custom options to a single iOS device:
- In the MAM admin console, navigate to Devices, and select the device from the device list.
- In the Device Details dialog, click Custom Options.
- Click Edit, enter the key/value pairs in JSON format and click Save.
- Click Deploy Workflow to deploy to the device.
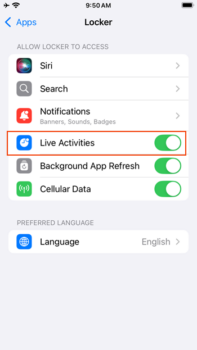
Verify the Device is Using Live Activities
To verify whether Imprivata Locker is using Live Activities:
On the device, navigate to Settings > Apps > Locker and ensure that Live Activities is switched on.