
NOTE: This article applies to iOS devices only.
After you’ve set up, tested and automated your check out workflows and also validated your environment supports Password AutoFill, you’re ready to get started.
Password AutoFill is available only when Admin > Check Out > Identity Provider is set to Imprivata Enterprise Access Management.
iOS Keychain is Disabled
Beginning with 7.0, when you create a new Check In workflow for iOS devices, the iOS Keychain is automatically disabled. This prevent users from inadvertently storing passwords on the device.
Requirements
-
Requires Launchpads running 7.0 or later software.
Enable AutoFill on the iOS Device
Each iOS device must be manually configured to the Imprivata AutoFill extension — unfortunately there is no way to do this automatically using an MDM or Mobile Access Management.
To enable Password AutoFill on the iOS device:
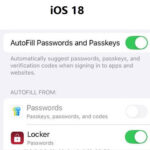
- For iOS 18.x, go to Settings > General> Autofill & Passwords > turn ON.
- Turn on Autofill from Locker. When Autofill is enabled, credentials from the Locker app will be suggested for filling in apps.
- In iOS 18, ensure that the Passwords setting is not toggled on.
BEST PRACTICE: If you are not erasing the device, this setting will persist between checkouts. Imprivata strongly recommends not erasing devices between checkouts for this reason.
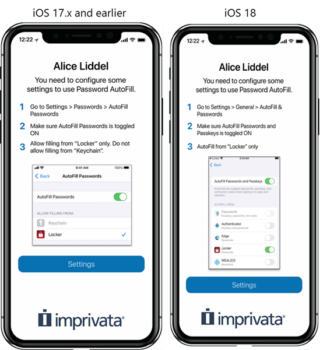
If AutoFill is enabled on the MAM server, but a device does not have AutoFill set in Settings, the device will display the following reminder screen on Check Out.
Create Upload and Deploy Imprivata Enterprise Access Management Profiles
For detailed instructions on creating application profiles for Imprivata Enterprise Access Management (OneSign), see Create Imprivata Enterprise Access Management Profiles.
Questions?
Check out our Password AutoFill FAQ.